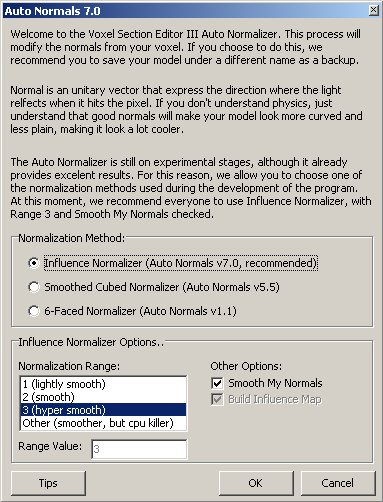
The version 1.36 of the Voxel Section Editor III and newer comes with a fully customizable AutoNormalizer dialog. It may look greek for some, but the purpose of this tutorial is to make it simple and provide aditional tips.
Auto Normalizing your Voxels with VXLSE III
Index:
1. Introducting The Auto Normalizer.
2. Using Auto-Normalizers from Previous Versions.
- 2.1 6-Faced Normalizer from VXLSE III 1.2c and earlier.
- 2.2 Cubed Normalizer from VXLSE III 1.2c.
- 2.3 Smooth Cubed Normalizer from VXLSE III 1.31
- 2.4 Smooth Cubed Normalizer (v5.2) from VXLSE III 1.35.
- 2.5 Smooth Cubed Normalizer (v5.5) from VXLSE III 1.36.
- 2.6 Influence Normalizer (v6.1) from VXLSE III 1.35.
- 2.7 Influence Normalizer (v7.0) from VXLSE III 1.36.
1. Introducting The Auto Normalizer.
Each pixel of the voxel has one normal value. The normal is the vector that determines the direction where the light reflects once it hits the pixel. Well normalized models does not look plain or straight. It has well done and visible curves, which improving a lot the quality of the voxel.
The VXLSE III Auto Normalizer was created to not let you waste your time painting the normals on your own. Since the auto-normalizer is on a experimental stage, it allows you to choose the method and its related options. If you can't be arsed to know what is the best option for your model, simply click OK. The default option should be the best for 90% of the models.

There are three methods used for normalization:
-> Influence Normalizer (aka, AutoNormals 7.0)
>>>> Fast (only if Range is 1).
>>>> The smoothest option.
>>>> Average contrast.
>>>> Bright normals.
-> Smooth Cubed Normalizer (aka, AutoNormals 5.5)
>>>> Slow.
>>>> Smooth.
>>>> High contrast.
>>>> Dark normals.
-> 6-Faced Normalizer (aka, AutoNormals 1.1)
>>>> Fast
>>>> Too rigid.
>>>> Very high contrast.
>>>> Bright normals
The first two Normalizers allows you to choose extra options that may heavly affect the time it will take to normalizer and, specially, the final quality.
-> Range: This option affects the amount of pixels scanned during the normalization and smooth operations. The higher, the smoother the result, but your processor will suffer the consequences. All VXLSE III prior to 1.36 used range 1. Most of voxels should have an excelent result with Range 2. Range 3 might affect few of them. You can use higher ranges, but it will take far too much time and the result will be very similar to range 3.
-> Smooth My Normals: Since VXLSE III 1.3, the normalizer smoothed the normals by default. If you uncheck this box, it won't smooth the normals during the normalization. It's heavly recommended to keep it checked.
-> Build Influence Map: Since VXLSE III 1.32, the cubed normalizer used to build a sort of 'influence map' to determine a convex shape of the model and avoid those pixels on 1-pixel wide walls to get wrong values (usually 0,0,0). Uncheck it if you want to disable this procedure. We recommend you to keep it checked.
2. Using Auto-Normalizers from Previous Versions.
Here's the settings that will allow you to use the autonormals featured on old versions (for nostalgic people, or someone who thinks that the cubed normalizer from 1.2c ruled the universe):
- 2.1 6-Faced Normalizer (v1.1) from VXLSE III 1.2c and earlier.
Simply select 6-Faced Normalizer.

- 2.2 Cubed Normalizer (v3.0) from VXLSE III 1.2c.
Select Smooth Cubed Normalizer. Range should be 1. Uncheck Smooth and Influence Map options.

- 2.3 Smooth Cubed Normalizer (v4.1) from VXLSE III 1.31.
Select Smooth Cubed Normalizer. Range should be 1. Check Smooth and uncheck Influence Map options.

- 2.4 Smooth Cubed Normalizer (v5.2) from VXLSE III 1.35.
Select Smooth Cubed Normalizer. Range should be 1. Check Smooth and Influence Map options.

- 2.5 Smooth Cubed Normalizer (v5.5) from VXLSE III 1.36.
Select Smooth Cubed Normalizer. Range should be 3. Check Smooth and Influence Map options.

- 2.6 Influence Normalizer (v6.1) from VXLSE III 1.35.
Select Influence Normalizer. Range should be 1. Check Smooth.

- 2.7 Influence Normalizer (v7.0) from VXLSE III 1.36.
Select Influence Normalizer. Range should be 3. Check Smooth.

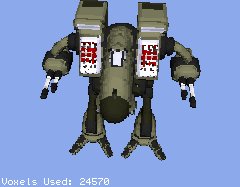
Click in the Mad Dog píctures above to see a 360' version of each.
That's it. I hope you enjoy it and get the best normals possible for your model.
Note: Mad Dog voxel was made by WeeRaby2k and it is available for download at YR Argentina
Auto Normalizing your Voxels with VXLSE III
Index:
1. Introducting The Auto Normalizer.
2. Using Auto-Normalizers from Previous Versions.
- 2.1 6-Faced Normalizer from VXLSE III 1.2c and earlier.
- 2.2 Cubed Normalizer from VXLSE III 1.2c.
- 2.3 Smooth Cubed Normalizer from VXLSE III 1.31
- 2.4 Smooth Cubed Normalizer (v5.2) from VXLSE III 1.35.
- 2.5 Smooth Cubed Normalizer (v5.5) from VXLSE III 1.36.
- 2.6 Influence Normalizer (v6.1) from VXLSE III 1.35.
- 2.7 Influence Normalizer (v7.0) from VXLSE III 1.36.
1. Introducting The Auto Normalizer.
Each pixel of the voxel has one normal value. The normal is the vector that determines the direction where the light reflects once it hits the pixel. Well normalized models does not look plain or straight. It has well done and visible curves, which improving a lot the quality of the voxel.
The VXLSE III Auto Normalizer was created to not let you waste your time painting the normals on your own. Since the auto-normalizer is on a experimental stage, it allows you to choose the method and its related options. If you can't be arsed to know what is the best option for your model, simply click OK. The default option should be the best for 90% of the models.

There are three methods used for normalization:
-> Influence Normalizer (aka, AutoNormals 7.0)
>>>> Fast (only if Range is 1).
>>>> The smoothest option.
>>>> Average contrast.
>>>> Bright normals.
-> Smooth Cubed Normalizer (aka, AutoNormals 5.5)
>>>> Slow.
>>>> Smooth.
>>>> High contrast.
>>>> Dark normals.
-> 6-Faced Normalizer (aka, AutoNormals 1.1)
>>>> Fast
>>>> Too rigid.
>>>> Very high contrast.
>>>> Bright normals
The first two Normalizers allows you to choose extra options that may heavly affect the time it will take to normalizer and, specially, the final quality.
-> Range: This option affects the amount of pixels scanned during the normalization and smooth operations. The higher, the smoother the result, but your processor will suffer the consequences. All VXLSE III prior to 1.36 used range 1. Most of voxels should have an excelent result with Range 2. Range 3 might affect few of them. You can use higher ranges, but it will take far too much time and the result will be very similar to range 3.
-> Smooth My Normals: Since VXLSE III 1.3, the normalizer smoothed the normals by default. If you uncheck this box, it won't smooth the normals during the normalization. It's heavly recommended to keep it checked.
-> Build Influence Map: Since VXLSE III 1.32, the cubed normalizer used to build a sort of 'influence map' to determine a convex shape of the model and avoid those pixels on 1-pixel wide walls to get wrong values (usually 0,0,0). Uncheck it if you want to disable this procedure. We recommend you to keep it checked.
2. Using Auto-Normalizers from Previous Versions.
Here's the settings that will allow you to use the autonormals featured on old versions (for nostalgic people, or someone who thinks that the cubed normalizer from 1.2c ruled the universe):
- 2.1 6-Faced Normalizer (v1.1) from VXLSE III 1.2c and earlier.
Simply select 6-Faced Normalizer.

- 2.2 Cubed Normalizer (v3.0) from VXLSE III 1.2c.
Select Smooth Cubed Normalizer. Range should be 1. Uncheck Smooth and Influence Map options.

- 2.3 Smooth Cubed Normalizer (v4.1) from VXLSE III 1.31.
Select Smooth Cubed Normalizer. Range should be 1. Check Smooth and uncheck Influence Map options.

- 2.4 Smooth Cubed Normalizer (v5.2) from VXLSE III 1.35.
Select Smooth Cubed Normalizer. Range should be 1. Check Smooth and Influence Map options.

- 2.5 Smooth Cubed Normalizer (v5.5) from VXLSE III 1.36.
Select Smooth Cubed Normalizer. Range should be 3. Check Smooth and Influence Map options.

- 2.6 Influence Normalizer (v6.1) from VXLSE III 1.35.
Select Influence Normalizer. Range should be 1. Check Smooth.

- 2.7 Influence Normalizer (v7.0) from VXLSE III 1.36.
Select Influence Normalizer. Range should be 3. Check Smooth.

Click in the Mad Dog píctures above to see a 360' version of each.
That's it. I hope you enjoy it and get the best normals possible for your model.
Note: Mad Dog voxel was made by WeeRaby2k and it is available for download at YR Argentina

